Getting Started with FastAPI: Installation, Setup and Deploy

Introduction
FastAPI is a modern, fast, web framework for building APIs with Python 3.7+ based on standard Python type hints. It is built on top of Starlette for the web parts, and Pydantic for the data parts. With FastAPI, you can build APIs quickly and easily, with minimal setup and overhead.
Upgrading pip
It's a good idea to keep your pip installation up-to-date to ensure that you have the latest bug fixes and features. To upgrade pip, you can run the following command:
python -m pip install --upgrade pip
Creating a virtual environment
A virtual environment is a way to isolate your Python environment from the rest of your system, which can be useful for managing dependencies and avoiding conflicts.
python -m venv myenvThis creates a virtual environment named myenv, to activate it we use the command:
source myenv/bin/activateThen we can continue and install FastAPI inside of it. By using a virtual environment, you can keep your dependencies and your application isolated, which can make it easier to manage your application and avoid conflicts.
Installing FastAPI / Uvicorn
Uvicorn is a high-performance, production-ready asyncio server for Python 3.6+ based on the FastAPI framework and inspired by Gunicorn. It is designed to be easy to use, fast, and scalable.
With Uvicorn, you can start a FastAPI application with a single command, and it will handle the heavy lifting of serving your application to users. Uvicorn is highly configurable, and you can tune it to meet the needs of your specific use case, whether you're serving a small personal website or a large, complex web application.
FastAPI and Uvicorn can be installed using the pip package manager.
pip install fastapi
pip install uvicorn[standard]
Creating a FastAPI application
Once you have installed FastAPI, you can start building your first application. FastAPI makes it easy to get started, with a minimal amount of code required.
from fastapi import FastAPI

app = FastAPI()

@app.get("/")
def read_root():
    return {"Hello": "World"}

@app.get("/items/{item_id}")
def read_item(item_id: int, q: str = None):
    return {"item_id": item_id, "q": q}
main.py
The above code defines a FastAPI application with two endpoints. The first endpoint returns a simple "Hello World" message when accessed at the root URL ("/"). The second endpoint accepts an item ID and an optional query parameter "q".
Running the FastAPI application
To run your FastAPI application, simply run the following command:
uvicorn main:app --reload
This will start a local development server that you can use to test your application. You can access your application at http://localhost:8000. You should see the "Hello World" message when you access the root URL, and you can test the second endpoint by accessing http://localhost:8000/items/{item_id} and passing an item_id as a path parameter and q as a query parameter.
The --reload option for Uvicorn should only be used during development. This option enables automatic reloading of your application code whenever a change is detected, which can be convenient for iterative development and testing.
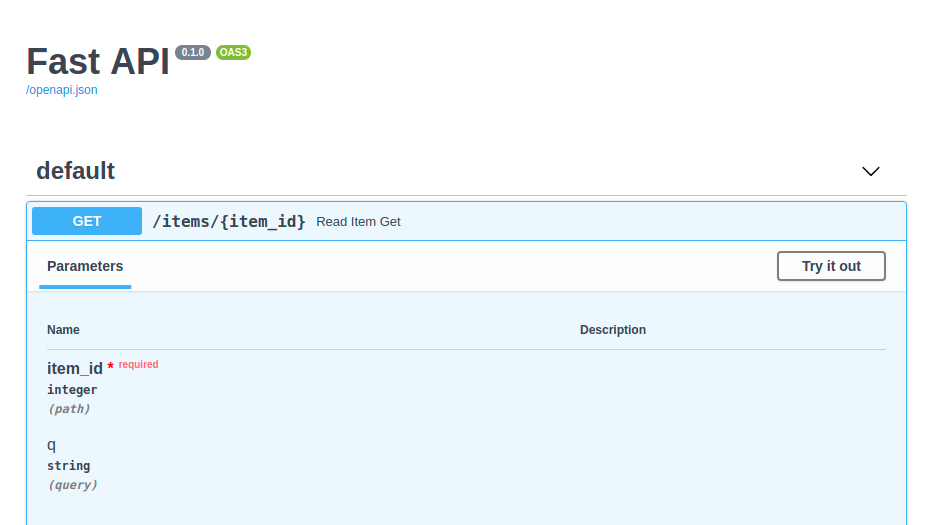
Interactive API docs
Now you can go to http://127.0.0.1/docs
You will see the automatic interactive API documentation (provided by Swagger UI):
Deployment
There are several ways to deploy a FastAPI application with Uvicorn in production, some of the most common ones include:
The reverse proxy server listens for incoming requests, and then forwards the requests to your FastAPI application.
uvicorn main:app --host 0.0.0.0 --port 8000 --proxy-headers--reload option if you were using it.This command runs Uvicorn and binds it to the host 0.0.0.0 and port 8000. Note that binding to port 80 requires root privileges.
The --proxy-headers option for Uvicorn is for when you are running your app behind proxy like Nginx or Traefik.
server {
    listen 80;
    server_name my_domain.com;

    location / {
        proxy_pass http://0.0.0.0:8000;
        proxy_set_header Host $host;
        proxy_set_header X-Real-IP $remote_addr;
    }
}
Nginx - Example config
In this example, Nginx is listening on port 80 and forwarding incoming requests to the Uvicorn server running at 0.0.0.0:8000
Conclusion
Regardless of the method you choose, it's important to follow best practices for securing and maintaining your production environment, such as using SSL certificates, regular backups, and monitoring your application for performance and errors.